
Disclaimer and Warning: the following information on gate construction is meant as an explanation of what we did, not as instructions for any other work on any gate or door. USE AT YOUR OWN RISK. Any gate or door work done on any building or enclosure should be carried out only by qualified carpenters or specialists using the highest established standards of work and the best quality new parts.
Any children using a loft and access ladder, should be supervised and taught how to use loft (or tree house etc.) gate equipment. Loft (or tree house) access and enclosure equipment is inherently dangerous.
See below for further warning.
Right Angle Gate construction or How, hopefully, to make a loft a safer place.
A check of the local lumber yards and hardware stores, big box and small, yielded no gates or doors suitable to close off a gaping hole to our loft (semi-log cabin design). We needed some way to secure the sleeping loft in our cabin.
The web did not seem to offer anything in design or ready to buy, so it quickly became evident that we had to make our own. Here is our first and only effort to make a ‘right angle gate’ that is really safe and secure, yet can be opened from below or above. In the future, a battery powered LED night light (that turns on automatically when the gate is opened) will be added.
The Right Angle Gate is made from discarded bed angle iron which may well be the ideal material. Bed angle iron is tempered (hardened), so it is thinner and lighter steel than regular angle iron. You will dull your drill bits quickly on this hardened material – I used my DrillDoctor bit sharpening tool often!
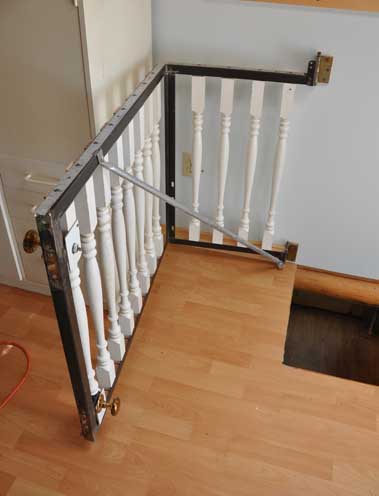
Here you can see the simple design with its elegant diagonal stay to keep everything square in 3D. The diagonal was placed slightly off center.
One obvious advantage of this design is that the gate opens wide – well out of the way of furniture being hoisted up into the loft.
In the closed position, I took advantage of a supporting post for the “jamb”. Of course, it is not easy to make the gate close perfectly in line with the post, so I added a strip of wood along the upright which was shimmed to fit better.
When you swing the gate closed it makes a gratifying double “Ka Chunk” sound. Very good, if the reader will forgive a lack of modesty!
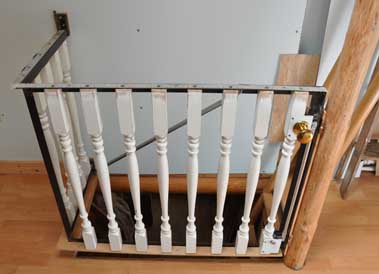
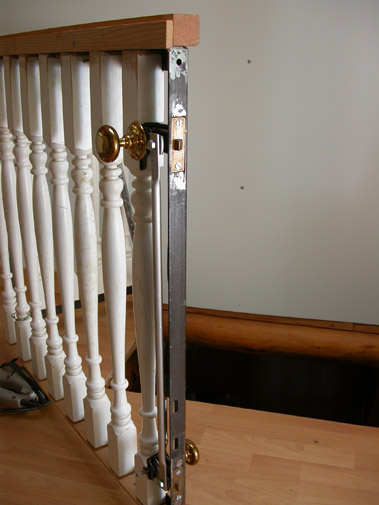
There are two welded upright parts to the gate frame, one at the corner (as can be seen here) and one at the lock end. The end with the hinges did not require such an upright.
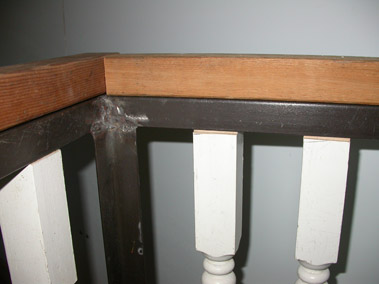
Here is a picture of the inside of the corner showing my poor welding skills.
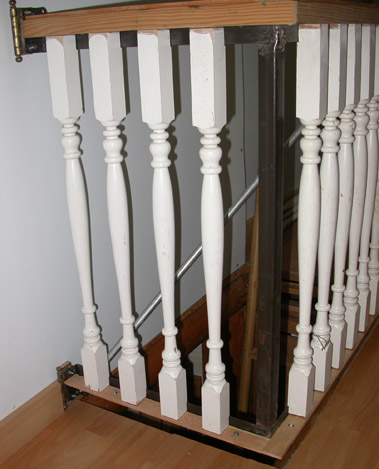
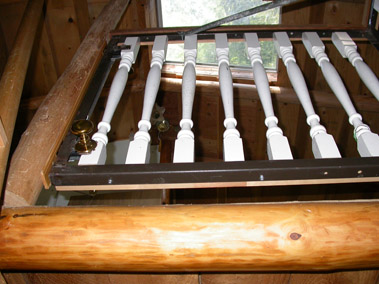
It takes some time to cut and shape the wooden balusters to fit nicely. The wooden top rail has yet to be finished.
Eventually some kind of trim wood will find its way to the upper gate surface and everything will be urethaned or painted white.
The most time consuming part of the design was the double latch mechanism with its interconnected upper and lower door knob system.
I took the time to let the latches into the steel frame which meant they needed a recessed ‘pocket’ to sit in.
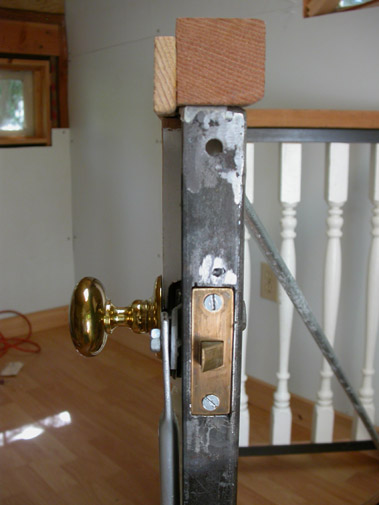
Here you can get a better idea of how the system worked out. Again, I wanted the latches to sit flush with the face of the frame.
I picked up the pair of solid brass knobs, latches and receiving plates for $2 at a “Country Fair” – thrifty.
You can see the top of the connecting rod that allows both latches to be opened with the top or bottom knob. Sheer genius if I don’t mind saying so myself!
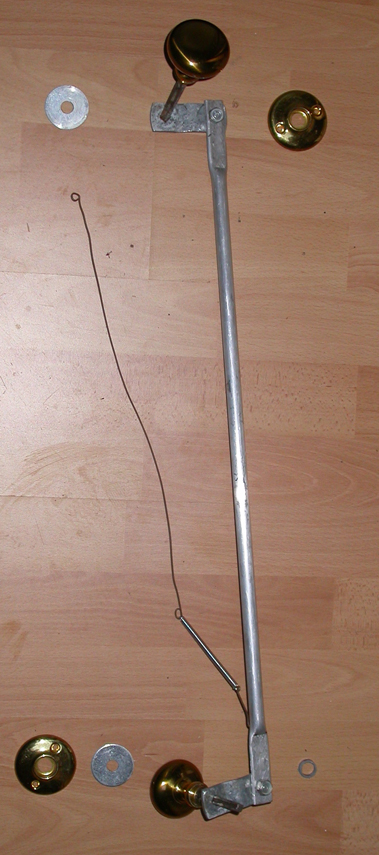
Details of the simple way the two locks are connected can be seen here.
Ends of the aluminum tubing were squashed in a vise. Two bolts attach the rod-ends to the offset levers, top and bottom. Square profile holes (hand filed) grip the knob shafts and finally a wire and spring help support the weight of the mechanism so that there is no “droop”.
A number of big “fender washers” help centralize the mechanism preventing any binding. The entire mechanism is best left quite loose, again preventing binding or unwanted resistance to smooth movement.
Time for a pint.
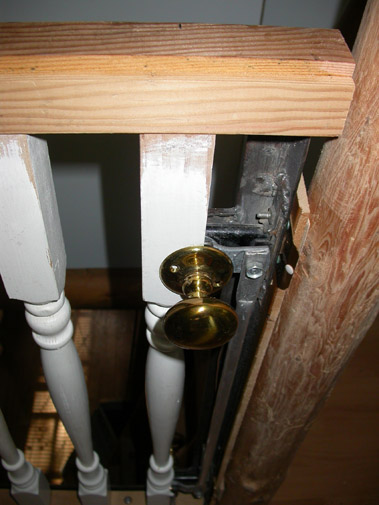
Here you can see an inside view of the upper latch projecting inboard with the knob feeding through. You can see the lever, in place, controlled by a standard old fashioned square knob shaft. Again, the lever controls the vertical aluminum connecting rod.
Latch receivers – here is the top one attached to the pole – simply sit on a piece of shimmed wood screwed to the post. I must improve the appearance of this some year.
As you climb the ladder to the loft, you are presented with the lower outer knob. As you turn the knob, the system opens both lower and upper locks.
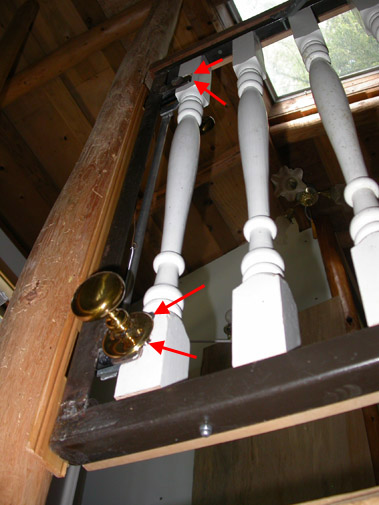
One mistake I made was attaching the wooden balusters so that the outermost one was too close to the locking system. I had to cut away (arrows) a good chunk of wood, top and bottom, to make everything fit.
As can be seen here on the bottom steel rail, I used capped nuts anywhere hands will touch the gate – no scratched fingers please.
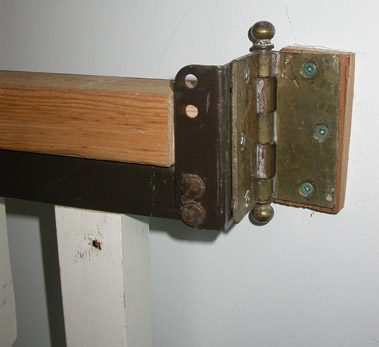
In keeping with the frugal budget for this gate project, a pair of old hinges was recycled and pressed into service.
The bed frame ends, held vertically with paired rivets, provide an excellent hinge attachment point.
Note the 3/8″ rectangular plywood spacer (between hinge and wall) that holds the hinge off the wall. This allows precise adjustment of the gate yaw (or is it pitch or roll?). Of course, I removed the panelling and built a very strong upright behind the wall. It was made from a fir 2X6 firmly attached with Simpson Strong Ties (metal brackets) – it does not move and provides stable attachment for the hinges.
Here is another look at what you see as you climb up to the loft. Note that the diagonal ‘stay’, made from a piece of electrical conduit, is positioned so that it starts at the high point above your head and projects downward to the right, away from your head.
The ‘stay’ can be seen at the top of the picture. Even if you ascend the ladder with a fair bit of ‘wobbling’, post Pub, you should not bang your skull or shoulder as you open the gate.
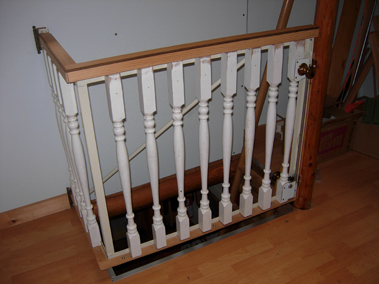
A few finishing pieces and some paint concluded the job.
Cost of Right Angle Gate: $50-$60
•bed frame with useful vertical frame ends: $20 (from ‘Sally Ann’ second hand store – this struck me as very expensive… on the other hand the Salvation Army is a worthy cause)
•cutting/welding: $15 (nominal, as work was home done)
•16 used wooden balusters: $2 (school “country fair”)
•pair of knobs & locks: $2 (school “country fair”)
•Misc used locks and hinges, wood, hardware, paint: $10 – $20 (nominal, as almost all came from our own legendary basement resources)
Note that the right angle gate shown above has no locks to prevent “sleep walkers”, children, or intoxicated persons from opening the gate and falling or otherwise injuring themselves or others. There are inherent dangers in any type of gate design.
This content last updated: Saturday, May 29, 2011. Uploaded Dec 24, 2023.
